
Open-Source LLM Monitoring, Tracing & Evaluation with Arize Phoenix – [Building GenAI Apps #10]
A practical guide to logging, debugging, and agent performance optimization

"It was 4:47 PM on a Friday when Sarah from accounting got the call that made her stomach drop. 'We never received payment for Invoice #2847,' said their biggest supplier. 'If we don't get the $47,000 by Monday, we're suspending your account.'
The problem? Their AI had read the invoice amount as $4,700 [
0] and processed payment accordingly. Three months of 'small' OCR accuracy drops had just created a $500K cash flow crisis."
MidCorp Manufacturing is a company with 250 employees processing over 2,000 invoices monthly. They implemented an AI-powered invoice processing system to save 40 hours of manual data entry each week.
The system, built on optical character recognition (OCR) and LLMs, promised efficiency and accuracy. However, over three months, the OCR accuracy silently degraded. Since there were no dashboards monitoring the solution to show any immediate red flags, failures went unnoticed, and by week nine, vendors began reporting payment discrepancies.
By week ten, the accounts payable team noticed a tripling of "exception" invoices requiring manual intervention. This story underscores a critical lesson: without robust monitoring, tracing, and evaluation, AI systems can erode trust and create significant business risks.

In the 6th release of the Building GenAI Apps# series, "Evaluating LLM Applications with DeepEval (Metrics, Methodologies, Best Practices)", we explored the foundation of large language model(LLM) evaluation, highlighting why traditional metrics like confusion matrices and mean squared error fall short for generative AI systems. If you haven’t read that article, I encourage you to check it out to build basic understanding of LLM evaluation.
Today, we advance our journey by diving into the critical practice of observability—monitoring, tracing, and evaluating AI agents to ensure they perform reliably in real-world applications. Specifically, we’ll introduce Arize Phoenix, an open-source tool designed for end-to-end AI observability, and guide you through a hands-on tutorial using OpenAI with receipt images to demonstrate tracing and performance evaluation.
The Importance of AI Observability
AI observability encompasses monitoring, tracing, and evaluating the behavior of AI systems to ensure they operate as intended. Unlike traditional software, where deterministic logic allows predictable debugging, AI systems, especially those powered by LLMs, are inherently nondeterministic.
Their outputs depend on complex interactions of data, prompts, and model parameters, making it challenging to pinpoint failures without specialized tools. Observability provides visibility into these interactions, enabling developers to detect issues like performance degradation, hallucinations, or incorrect tool usage early, before they escalate into crises like MidCorp’s.
Arize Phoenix, an open-source observability platform, addresses these challenges by offering tools for tracing, evaluation, prompt engineering, and experimentation. It integrates seamlessly with popular AI frameworks (OpenAI, Anthropic, Groq, etc) and provides a unified interface to monitor and debug LLM applications.
In this article, we’ll focus on Phoenix’s tracing and evaluation capabilities, using a practical example of processing receipt images. We’ll walk through a tutorial to build a custom LLM evaluator using a benchmark dataset, demonstrating how to trace and evaluate performance to avoid the pitfalls MidCorp faced.
Key Features of Arize Phoenix
1. Tracing: Understanding the Inner Workings of AI Agents
Tracing is the process of recording detailed logs of a software system’s execution, capturing each step from input to output. Think of it as a flight recorder for your application, documenting every decision, function call, and data transformation. Phoenix supports three primary methods for collecting traces, each suited to different development needs.
Phoenix Decorators
Phoenix offers decorators to mark specific functions or code blocks for tracing. Decorators are annotations in Python that wrap functions to add functionality, such as logging execution details. Phoenix provides predefined span decorators like @chain, @llm, and @tool, which categorize different parts of your application’s workflow.
For example, the @llm decorator can be used to trace calls to an LLM, capturing inputs, outputs, and metadata like token counts. Here’s a simple example of using Phoenix’s @llm decorator:
from phoenix.trace import llm

@llm
def call_llm(prompt):
    response = openai_client.chat.completions.create(
        model="gpt-4.1",
        messages=[{"role": "user", "content": prompt}]
    )
    return response.choices[0].message.content
This decorator logs the prompt, response, and execution time, making it easier to debug issues like incorrect outputs or latency spikes.
Phoenix Framework Integrations
Phoenix supports automatic instrumentation for popular frameworks like OpenAI, LlamaIndex, and LangChain. This method requires no manual code changes; once configured, Phoenix captures all calls to supported libraries automatically. For instance, integrating with OpenAI’s SDK ensures that every chat completion or embedding call is traced without additional coding. This is particularly useful for rapid prototyping or when working with complex frameworks where manual instrumentation is impractical.
OpenTelemetry Trace API
Phoenix leverages OpenTelemetry, an open-source standard for observability, to provide flexible, framework-agnostic tracing. OpenTelemetry defines a protocol (OTLP) for collecting telemetry data, including traces, metrics, and logs. Phoenix uses OpenTelemetry to capture detailed execution paths, such as the sequence of function calls or API interactions in an LLM application. This approach is ideal for custom applications or when integrating with less common frameworks. Curious readers can explore more at Arize’s OpenTelemetry documentation.
Tracing with Phoenix provides a granular view of your application, enabling you to identify bottlenecks, track token usage, or debug tool selection errors.
For example, in MidCorp’s case, tracing could have revealed the OCR model’s degrading accuracy by logging discrepancies between input images and processed outputs.
2. Evaluation: Measuring Performance with Precision
Evaluation is the process of assessing an AI system’s performance against defined criteria, such as accuracy, relevance, or freedom from hallucinations (outputs that are factually incorrect or fabricated). Phoenix’s evaluation framework allows developers to define custom metrics and use LLMs as judges to score outputs.
To illustrate, consider a basic evaluation for hallucination, where an LLM checks if an output aligns with provided context. Here’s an example inspired by Phoenix’s documentation:
import nest_asyncio
import pandas as pd
from phoenix.evals import HallucinationEvaluator, OpenAIModel, QAEvaluator, run_evals

nest_asyncio.apply()


df = pd.DataFrame(
    [
        {
            "reference": "The Eiffel Tower is located in Paris, France. It was constructed in 1889 as the entrance arch to the 1889 World's Fair.",
            "query": "Where is the Eiffel Tower located?",
            "response": "The Eiffel Tower is located in Paris, France.",
        },
        {
            "reference": "The Great Wall of China is over 13,000 miles long. It was built over many centuries by various Chinese dynasties to protect against nomadic invasions.",
            "query": "How long is the Great Wall of China?",
            "response": "The Great Wall of China is approximately 13,171 miles (21,196 kilometers) long.",
        },
        {
            "reference": "The Amazon rainforest is the largest tropical rainforest in the world. It covers much of northwestern Brazil and extends into Colombia, Peru and other South American countries.",
            "query": "What is the largest tropical rainforest?",
            "response": "The Amazon rainforest is the largest tropical rainforest in the world. It is home to the largest number of plant and animal species in the world.",
        },
    ]
)


# Set your OpenAI API key
eval_model = OpenAIModel(model="gpt-4o")

# Define evaluators
hallucination_evaluator = HallucinationEvaluator(eval_model)
qa_evaluator = QAEvaluator(eval_model)


df["context"] = df["reference"]
df.rename(columns={"query": "input", "response": "output"}, inplace=True)
assert all(column in df.columns for column in ["output", "input", "context", "reference"])


hallucination_eval_df, qa_eval_df = run_evals(
    dataframe=df, evaluators=[hallucination_evaluator, qa_evaluator], provide_explanation=True
)
In this case, the evaluator compares the LLM’s output against a reference context, assigning a label based on factual accuracy. Phoenix supports scalable evaluations, allowing you to run them on large datasets to identify patterns of failure, such as MidCorp’s OCR errors.
3. Prompt Engineering and Datasets & Experiments
While tracing and evaluation are our focus, Phoenix also offers tools for prompt engineering and datasets & experiments. Prompt engineering involves designing and refining prompts to optimize LLM performance.
Phoenix’s prompt playground allows developers to test and compare prompts interactively, though we won’t dive into this here. Similarly, the datasets and experiments feature enables systematic testing of different model configurations or prompts, storing traces for analysis.
These are powerful for iterative development but are beyond the scope of this tutorial. For a deeper exploration, refer to Arize’s documentation.
Hands-On Tutorial: Building a Custom LLM Evaluator with Receipt Images
To bring these concepts to life, let’s build a custom LLM evaluator using a benchmark dataset of receipt images, addressing the kind of issue MidCorp faced.
We’ll use OpenAI’s GPT-4.1 model to generate expense reports from receipt images and evaluate their accuracy with Phoenix. This tutorial assumes basic familiarity with Python but explains each step for beginners.
Step 1: Set Up Your Phoenix Account
Start by creating a free account at phoenix.arize.com. For those interested in self-hosting for data security or compliance, explore the options at Arize’s self-hosting guide.
After signing up, log in to your Phoenix dashboard.
Step 2: Generate and Store API Keys
Navigate to the settings section of your Phoenix dashboard and create an API key.
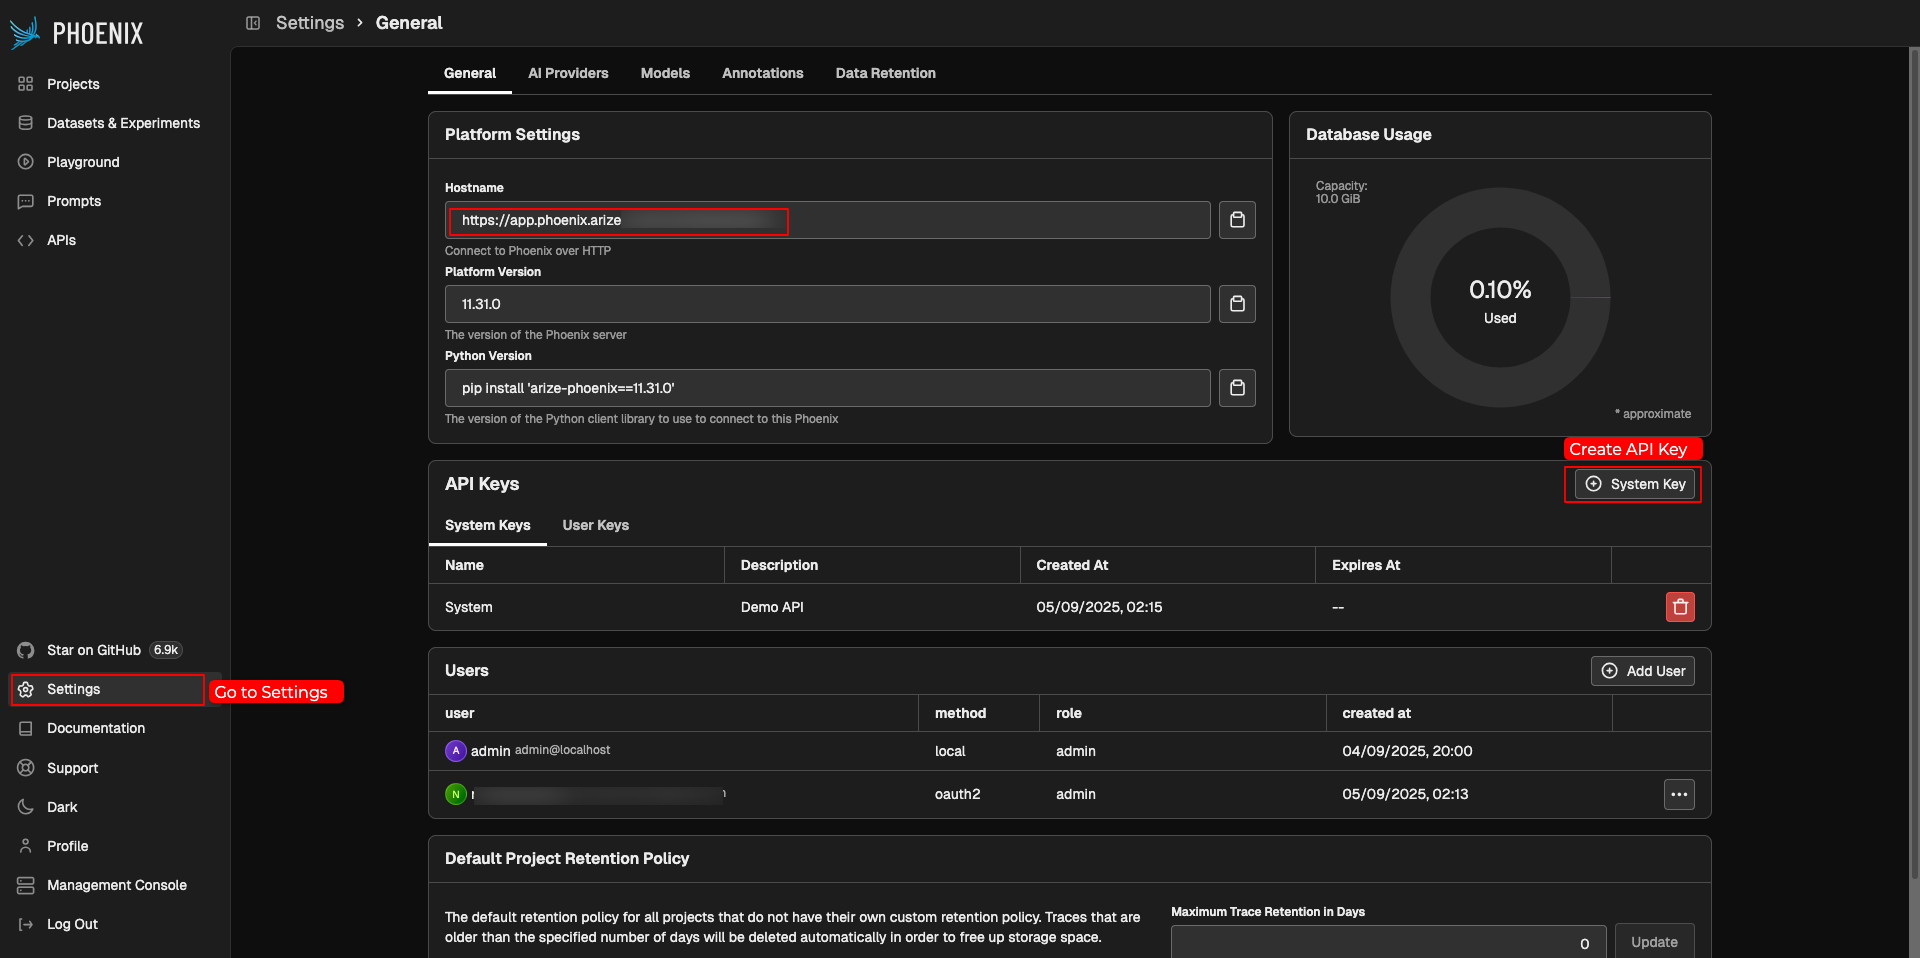
This key authenticates your application to send traces to Phoenix. Copy the API key and the collector/ hostname endpoint (e.g., https://app.phoenix.arize.com/s/sample_hostname) to a secure location.
You’ll also need an OpenAI_API_KEY for this tutorial, which you can obtain from OpenAI’s platform.
#install libraries
!pip install arize-phoenix arize-phoenix-otel openinference-instrumentation-openai

!pip install openai nest_asyncio
Step 3: Configure Environment Variables
Set up your environment variables to securely store your API keys. In a Python script or Colab notebook, use the following code to configure Phoenix and OpenAI:
import os
from getpass import getpass

if not os.getenv("PHOENIX_API_KEY"):
    os.environ["PHOENIX_API_KEY"] = getpass("Enter your Phoenix API Key: ")
if not os.getenv("PHOENIX_COLLECTOR_ENDPOINT"):
    os.environ["PHOENIX_COLLECTOR_ENDPOINT"] = getpass("Enter your Phoenix Collector Endpoint: ")
if not os.getenv("OPENAI_API_KEY"):
    os.environ["OPENAI_API_KEY"] = getpass("Enter your OpenAI API Key: ")
This code prompts you to input your keys if they aren’t already set, ensuring secure handling.
Step 4: Generate Traces with Receipt Images
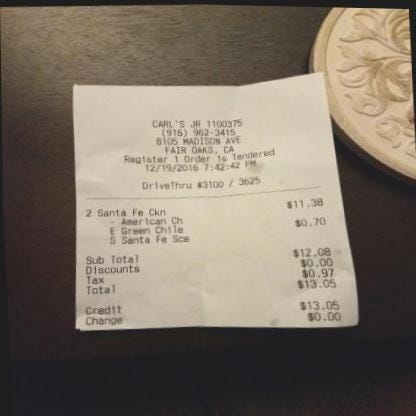
We’ll use a dataset of 20 receipt images from the Roboflow Universe Receipt or Invoice Dataset (Jakob, 2024, CC BY 4.0, available at Roboflow). These images will be processed by GPT-4.1 to generate expense reports, and Phoenix will trace the process. Here’s the code to generate traces:
from openai import OpenAI
import phoenix as px
from phoenix.otel import register
# Configure Phoenix tracer
tracer_provider = register(project_name="receipt-classification", auto_instrument=True)
# Initialize OpenAI client
client = OpenAI()
# List of receipt image URLs
urls = [
"https://source.roboflow.com/Zf1kEIcRTrhHBZ7wgJleS4E92P23/8M5px2yLoNtZ6gOQ2r1D/original.jpg",
# ... (include all 20 URLs from the provided code)
]
def extract_receipt_data(url):
response = client.chat.completions.create(
model="gpt-4.1",
messages=[
{
"role": "user",
"content": [
{
"type": "text",
"text": "Analyze this receipt and return a brief summary for an expense report. Only include category of expense, total cost, and summary of items",
},
{
"type": "image_url",
"image_url": {"url": url},
},
],
}
],
max_tokens=500,
)
return response.choices[0].message.content
# Generate traces for each receipt
for url in urls:
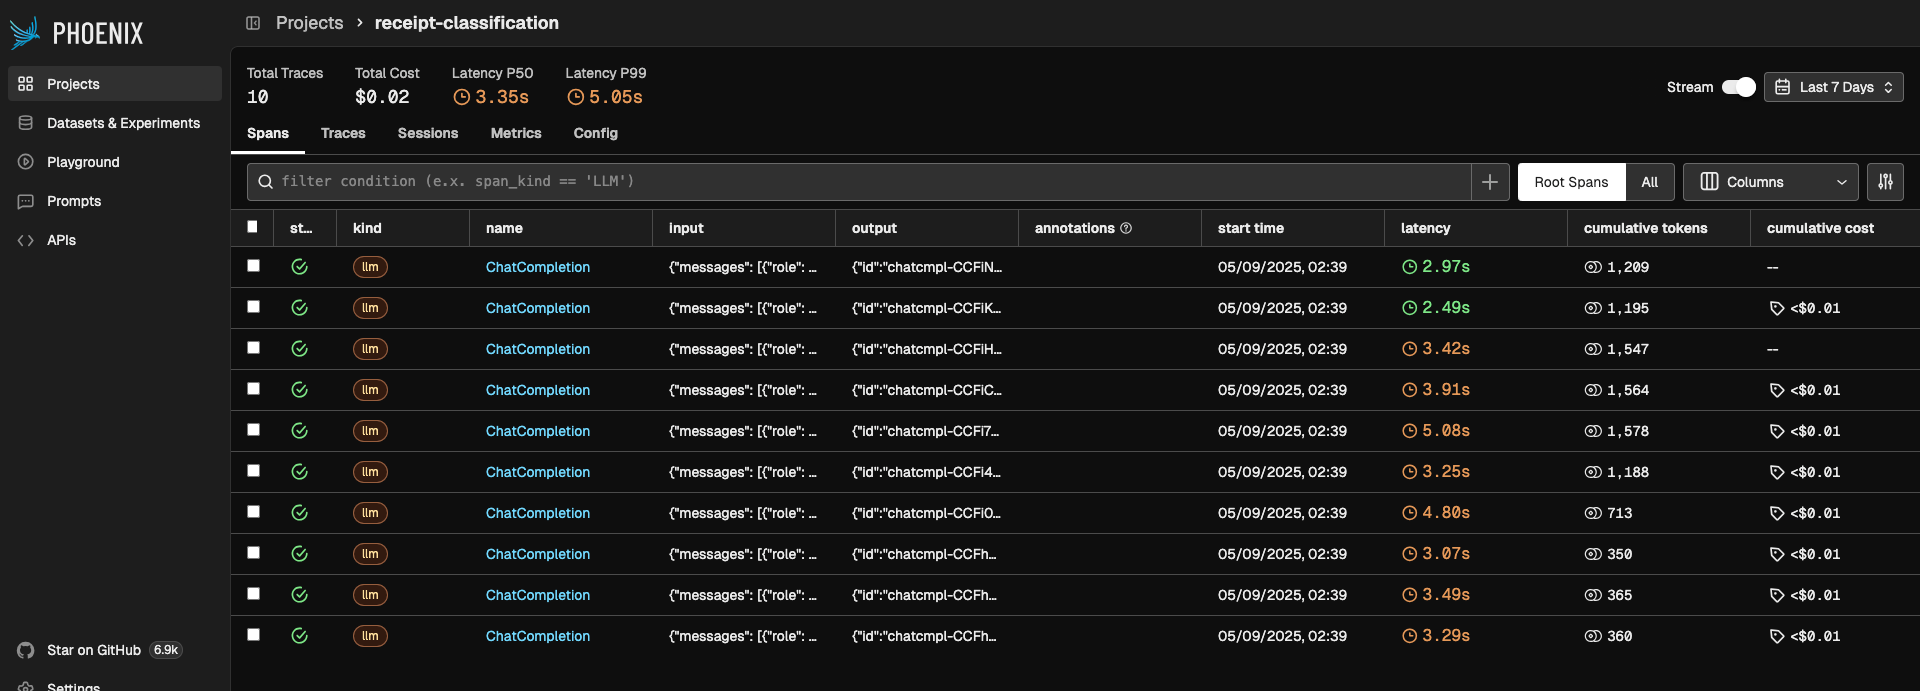
extract_receipt_data(url)This code sends each receipt image to GPT-4.1, which generates an expense report summarizing the expense category, total cost, and items. Phoenix automatically captures traces of these API calls, including inputs, outputs, and metadata.
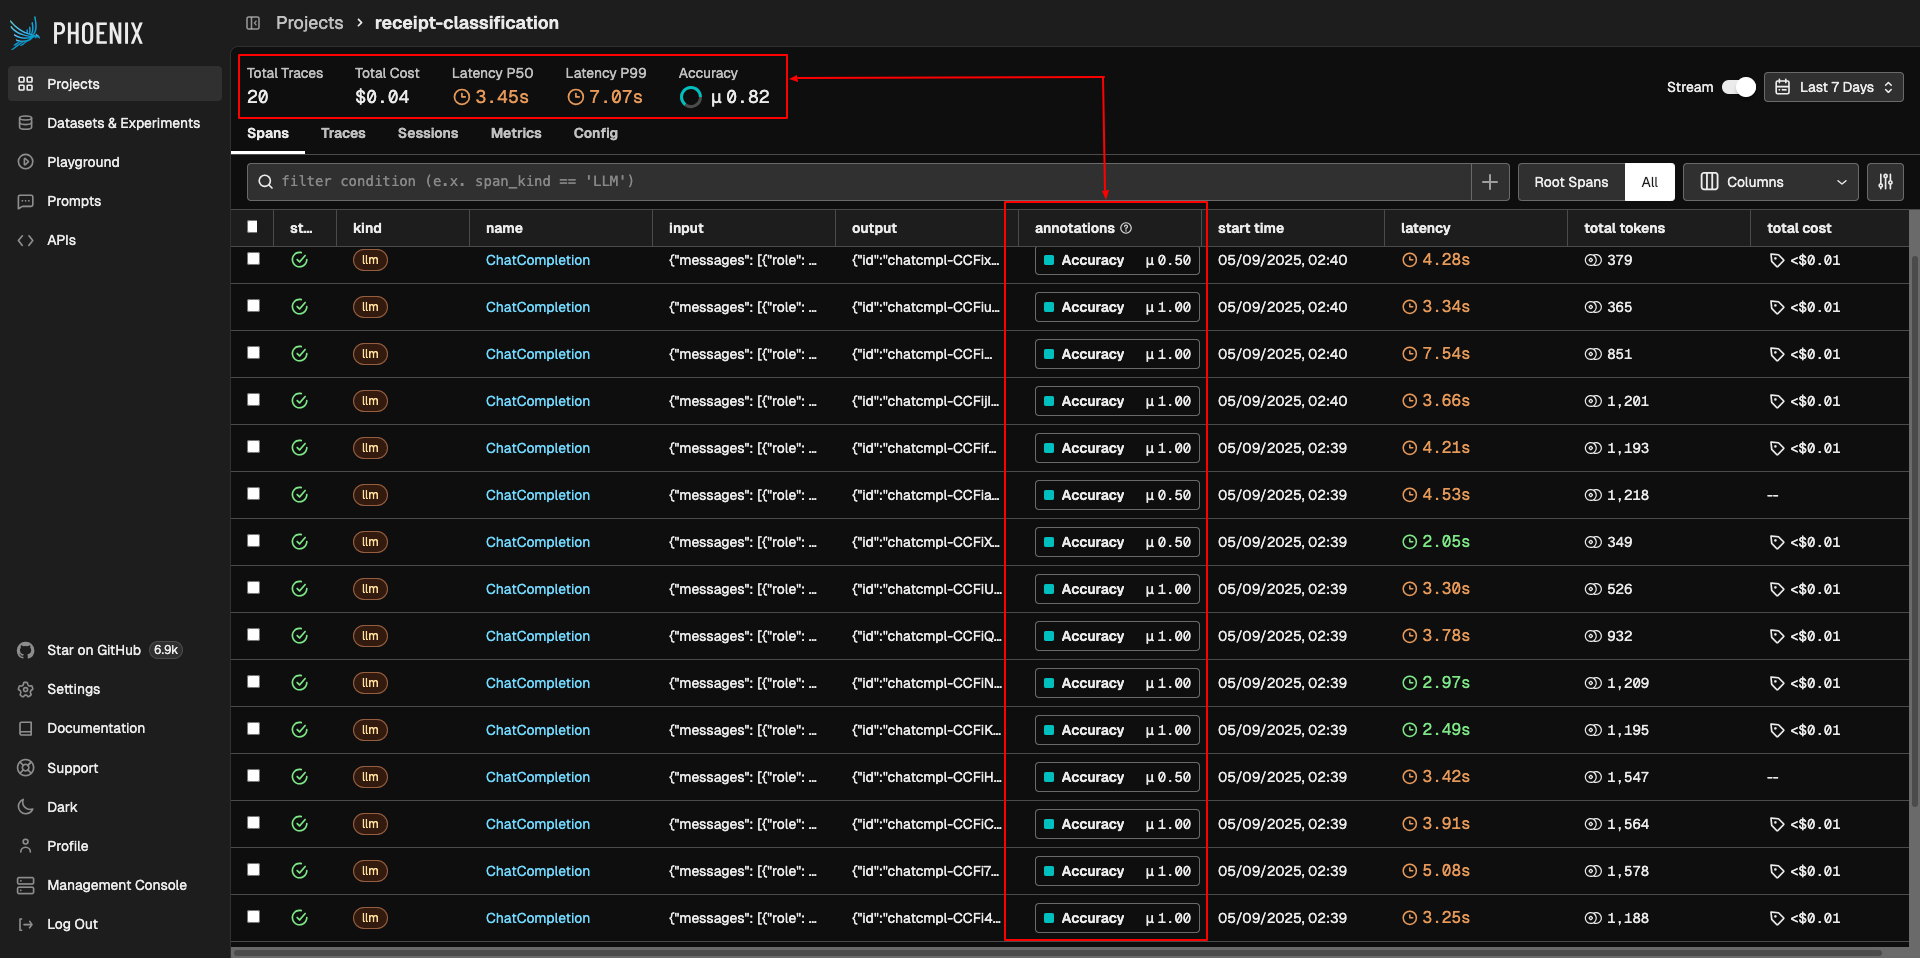
Step 5: Create a Benchmark Dataset and Annotate
Open your Phoenix dashboard to view the generated traces. Each trace represents an API call to OpenAI, showing the input image URL and the generated expense report.
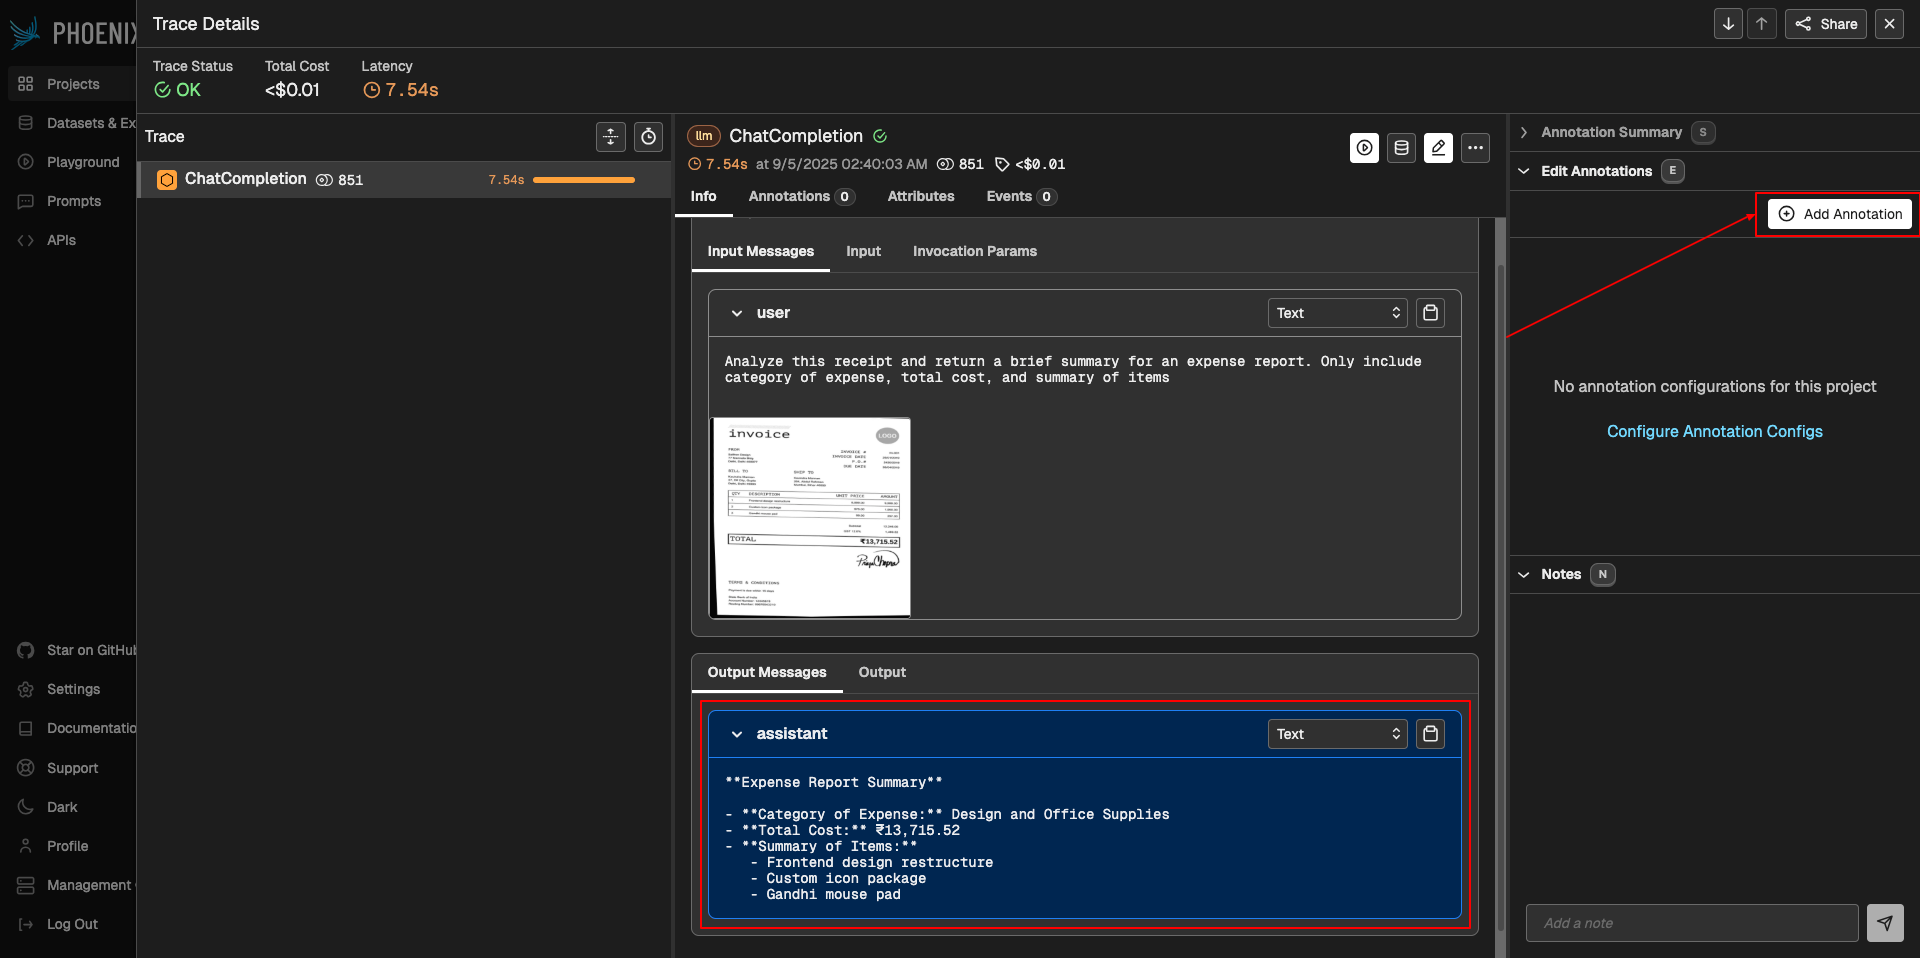
Annotate each trace based on accuracy, assigning one of three labels:
Accurate (score: 1): The total price, itemized list, and expense category are all correct.
Partially-accurate (score: 0.5): The report is mostly correct but has minor issues, such as a vague expense category.
Not-accurate (score: 0): The report is substantially wrong, such as an incorrect total price.
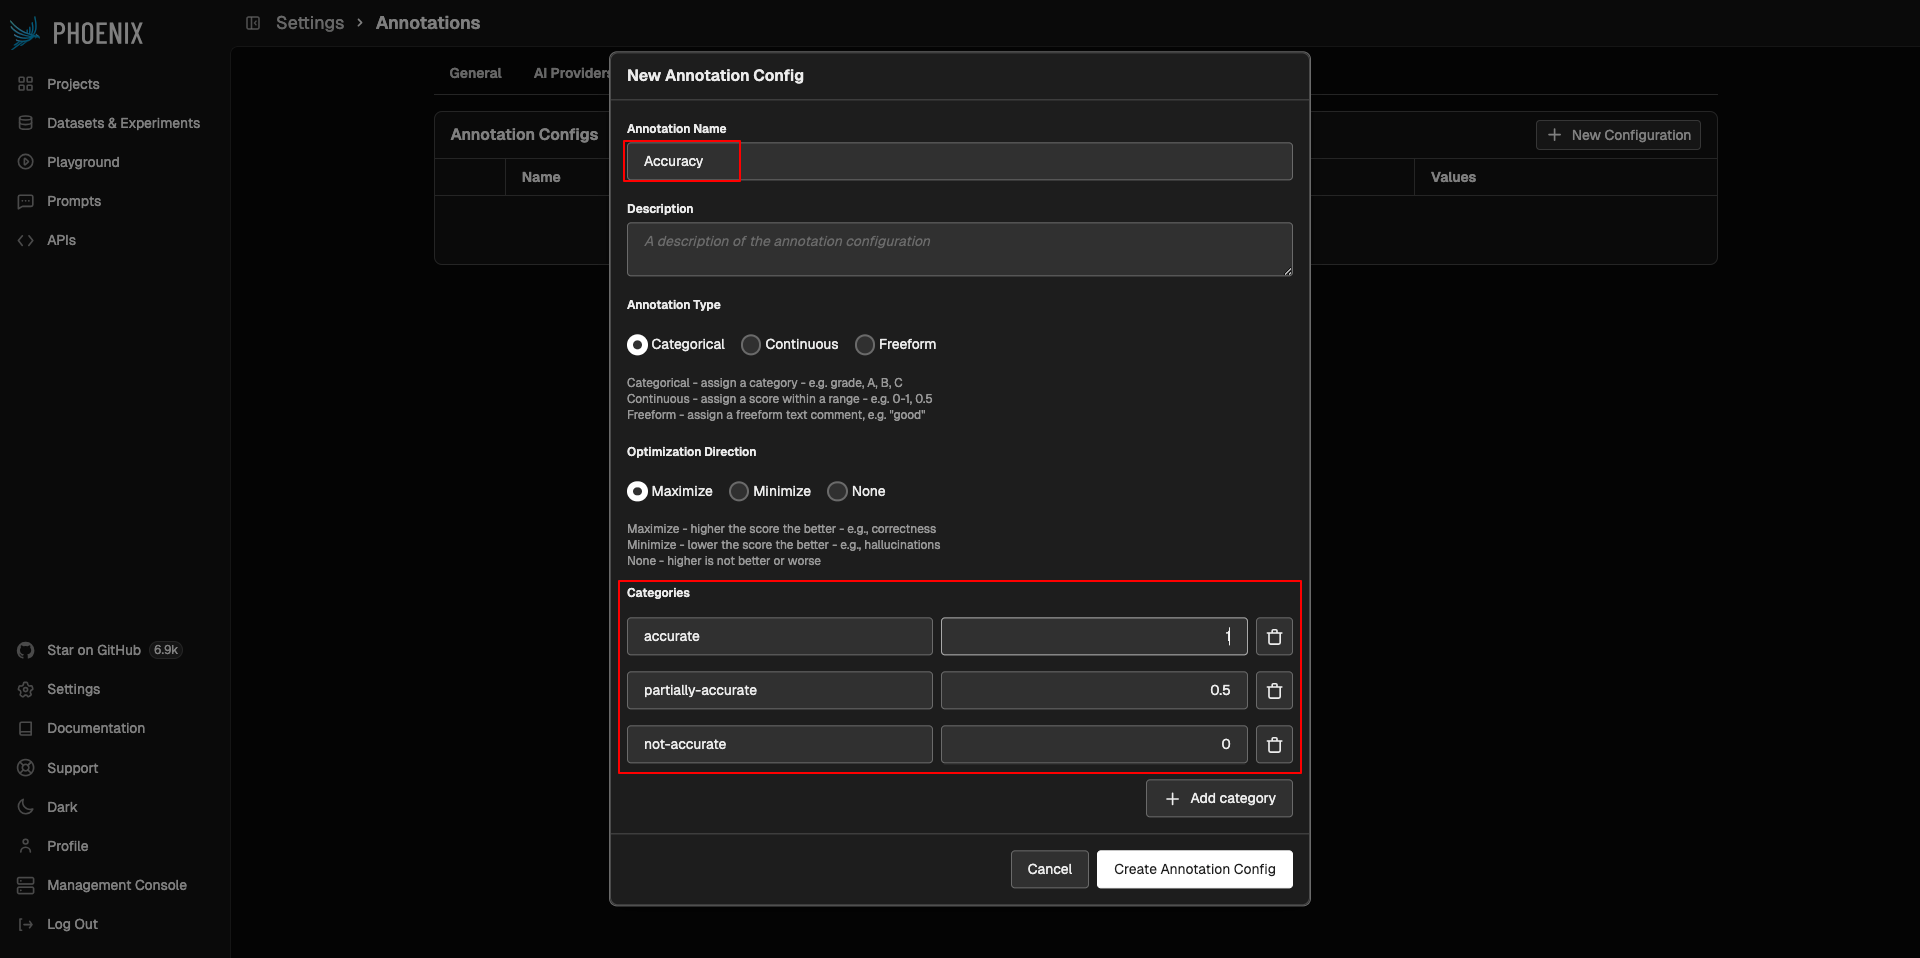
Go ahead and annotate all 20 traces:
To create a benchmark dataset, query the annotated traces and upload them to Phoenix:
from phoenix.client import Client
from phoenix.client.types import spans

client = Client(api_key=os.getenv("PHOENIX_API_KEY"))
query = spans.SpanQuery().where("annotations['Accuracy']")

spans_df = client.spans.get_spans_dataframe(query=query, project_identifier="receipt-classification")

annotations_df = client.spans.get_span_annotations_dataframe(spans_dataframe=spans_df, project_identifier="receipt-classification")
full_df = annotations_df.join(spans_df, how="inner")

dataset = client.upload_dataset(
    dataframe=full_df,
    dataset_name="annotated-receipts",
    input_keys=["attributes.input.value"],
    output_keys=["attributes.llm.output_messages"],
    metadata_keys=["result.label", "result.score", "result.explanation"],
)
This dataset serves as the ground truth for evaluating your LLM’s performance.
Step 6: Build and Run a Custom Evaluator
Define a custom evaluation template to assess the LLM’s expense reports. The template instructs an LLM (acting as a judge) to classify each report as “accurate”, “almost accurate”, or “inaccurate”.
Here’s the code to create and run the evaluator:
from phoenix.evals import ClassificationTemplate, PromptPartContentType, PromptPartTemplate
from phoenix.evals import OpenAIModel, llm_classify
from phoenix.experiments import run_experiment

rails = ["accurate", "almost accurate", "inaccurate"]
classification_template = ClassificationTemplate(
    rails=rails,
    template=[
        PromptPartTemplate(
            content_type=PromptPartContentType.TEXT,
            template="""You are an evaluator tasked with assessing the quality of a model-generated expense report based on a receipt.
Below is the model’s generated expense report and the input image:
---
MODEL OUTPUT (Expense Report): {output}
---
INPUT RECEIPT: """,
        ),
        PromptPartTemplate(
            content_type=PromptPartContentType.IMAGE,
            template="{image}",
        ),
        PromptPartTemplate(
            content_type=PromptPartContentType.TEXT,
            template="""Evaluate the following and assign one of the following labels:
- **"accurate"** – Total price, itemized list, and expense category are all accurate.
- **"almost accurate"** – Mostly correct but with small issues, e.g., vague expense category.
- **"inaccurate"** – Substantially wrong, e.g., incorrect total price.
Only include the label.""",
        ),
    ],
)

def task_function(input, reference):
    parsed = json.loads(input["attributes.input.value"])
    image_url = parsed["messages"][0]["content"][1]["image_url"]["url"]
    output = reference["attributes.llm.output_messages"][0]["message.content"]
    response_classification = llm_classify(
        data=pd.DataFrame([{"image": image_url, "output": output}]),
        template=classification_template,
        model=OpenAIModel(model="gpt-4o"),
        rails=rails,
        provide_explanation=True,
    )
    return response_classification.iloc[0]["label"]

def evaluate_response(output, metadata):
    expected_label = metadata["result.label"]
    predicted_label = output
    return 1 if expected_label == predicted_label else 0

dataset = client.get_dataset(name="annotated-receipts")
initial_experiment = run_experiment(
    dataset, task=task_function, evaluators=[evaluate_response], experiment_name="initial template"
)
This code defines a task function to classify expense reports and an evaluation function to compare the LLM’s predictions against your annotations. The experiment runs the evaluator on the dataset, producing a performance score.
Step 7: Iterate to Improve the Evaluator
To enhance the evaluator’s accuracy, refine the prompt template by adding specific rules or few-shot examples [see notebook for code blocks].
Run the experiment again to see if the refined template improves performance. You can further iterate by adding few-shot examples to guide the evaluator, as shown in the provided code.
Step 8: View and Analyze Results
After running the experiments, check the Phoenix dashboard for results. The platform visualizes trace data, evaluation scores, and explanations, helping you identify failure cases (e.g., vague categories or incorrect totals).
Continue iterating until the evaluator meets your desired performance threshold, which depends on your use case.

Next Steps
This tutorial demonstrates how Arize Phoenix enables robust monitoring, tracing, and evaluation for AI applications, preventing issues like those MidCorp faced. By tracing every step of the LLM’s processing and evaluating outputs against a benchmark dataset, you gain visibility into performance and can iteratively improve your system.
For a comprehensive guide, including advanced features like prompt engineering and experimentation, visit the official Phoenix documentation. Explore Phoenix’s integrations with frameworks like LlamaIndex and LangChain, and consider self-hosting for enterprise needs.
By incorporating observability into your AI development workflow, you can build reliable, production-ready applications that deliver value without hidden risks.